
I have been working really, really hard these past few days on the Frankencorset to try and have it in wearable shape for a Costumer's Guild outing in a couple of weeks. Unfortunately, after sewing all day yesterday (after work, anyway), and not even being able to finish binding one edge after 6 hours of sewing, I'm conceding that if I continue to work on these bloody things without moving on to a dress, then the stays would probably be the only thing I'd be wearing to the event. Eep!
Since I can't run around town in my undies, I'm putting Frankencorset aside and looking to alternatives for my event, namely, a set of short stays. One of my resolutions for this year was to use fewer commercial patterns and to draft more, so I resolved to draft myself a brand spankin' new pattern.
I started by taking my bust, underbust, underbust to armpit, underbust to mid-bust, bust separation (nip to nip), and shoulder to shoulder measurements. I had spent the day reading up on how short stays should fit, where seams should fall, bust gusset placement, and all sorts of things like that, so I felt pretty confident that I could draft something that was fairly historically accurate.
Since I found almost no info online on how to draft short stays from scratch, I thought I'd write everything up step-by-step for others to use in the future. Hopefully this will prove useful to others delving into Regency wear!
Step 1 - Take your underbust to mid-bust measurement and draw a vertical line on your drafting paper (I use a couple of sheets of computer paper taped together). To get this measurement, measure from your underbust to the middle of your nipple.

Step 2 - Take your underbust measurement and divide by four (4). From the bottom of your vertical line, draw a horizontal line that is as long as this measurement.


Step 7 - Now we're going to figure out where to put in pir bust gussets. Divide your nip-to-nip measurement by two (2). From the centre front of your pattern, measure this length and mark it.

Step 8 - Measure out one (1) inch on either side of your bust apex marking. These will be where your gussets are sewn in. Make your lines about 3 inches long.

Step 9 - To make your gussets, first draw a line that is equal in length to the length of your gusset lines on your front bodice pattern.

Step 10 - Subtract your underbust from your bust measurement, and divide the difference by four (4).This is the width needed for each gusset in order to make up your bust measurement. Divide this measurement in half, and measure out this much on either side of the top of your line.

Step 11 - Connect these dots with the bottom of the center line. Also, connect your dots at the top to form a triangle.

Step 12 - Now we'll draft the back of the stays. Start with a vertical line that is 8" long. At the bottom of the line, measure out your underbust/4 measurement and mark a horizontal line. From the end of that line, measure up your underbust to armpit measurement.


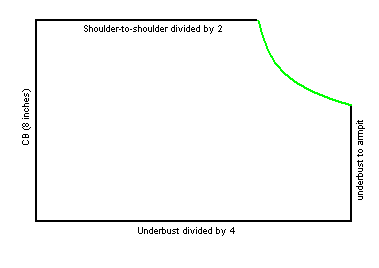


The strap attaches to the back at the end of your shoulder measurement, with the outer edge of the strap lining up with your side back seam, and laces to the front on your front tab. It's best to pin or baste your strap on first and then adjust the length before stitching it in for good. You may need to lengthen or shorten your strap according to your own fit and needs.

When I made my stays, I used three layers - an outer layer of cotton sateen, an interlining of cotton drill, and a lining of cotton muslin. When you insert the bust gussets, you have to work each layer individually, you can't work the outer fabric and interlining as one piece in this case. Sempstress has a really great tutorial on how to set gussets.
You'll want to work any cording before you set in the gussets, as it's much easier to do while everything is still flat. Short stays are not very heavily boned. I only added boning at the center front, center back, side seams, and diagonally across the front.

At the neckline edge of your stays, you'll want to include a drawstring casing. A drawstring at the neckline helps to wrangle the girls if your bust cups are slightly too large. (Too large is okay, but too small will cause problems. If in doubt when making your bust gussets, aim for larger.) Stitch down the end of your drawstring just inside your shoulder strap tab, and have your drawstring tie at your center front.


And there you have it! This should get you started on a set of short stays. I'm not going to include construction instructions since putting it together is all pretty simple, but hopefully you now have a pattern that you can work off of to create your own set of stays! Check out extant examples to get ideas for cording, embroidery, and other decorations. I really had fun adding the cording to mine, and there are tons of gorgeous extant examples out there, so have fun with it! To see the stays that I made, check out my Regency Short Stays post. Happy Stay Making!


Are the measurements taken while wearing a modern bra, so things are where they need to be? Thanks for the tutorial! I've been wanting to make myself a set of short stays.
ReplyDeleteYes, wear your regular bra when taking measurements. :) Good luck with your stays, I'd love to see them when you're finished! :D
DeleteThank you!
DeleteHi Megan, I found this tutorial very inspiring. I'm not sure where my under bust is, how far below my breasts?
DeleteHi, Judy! The underbust measurement is taken directly under the bust, around the ribcage. It's basically where the bottom edge of your bra hits.
DeleteThank you. Do the stays start at this point or did you make them a bit longer?
DeleteThat is where they start. :) You could make them a bit longer if you liked, but there's really no reason you should need to.
DeleteThank you so much for taking the time to share this tutorial!! It is very helpful! I can't wait to make one for myself.
ReplyDeleteAllo. Thank you so much for the tutorial, its wonderful to find someone so talented! Just a few questions, for the measurements does au natural work, most bras now days have push up insert bits. My girls so sit naturally farther apart then would be flattering in the undergarment. What does step 9 mean when drafting without a pattern to begin with? "Step 9 - To make your gussets, first draw a line that is equal in length to the length of your gusset lines on your front bodice pattern."
ReplyDeleteThank you for taking the time to post your helpful diagrams!
ReplyDeleteIf you are interested in seeing the short stays I made using your directions, here's a link to my blog post about them: https://www.robesdecoeur.com/blog/regency-short-stays-2015 .
The image was very helpful thank you! I'm also smaller in the bust measurement, so on my current paper draft, the gussets will be tiny. I'm tall and have wide shoulders which is making this... entertaining, to say the least.
DeleteRachel
If you haven't already made the corset, you could just do 1 gusset on each side instead of 2
DeleteMerci pour ce tuto très bien présenté!
ReplyDeleteHow do I add seam allowance to the bust gusset slits in the bodice front?
ReplyDeleteThere is no way to add seam allowance. The edges of the slit are turned back by about 1/4" when sewing in the gusset. The Sempstress has a good tutorial on how to insert bust gussets - http://www.sempstress.org/demo/setting-a-gusset/
DeleteThank you so very much for this tutorial! It made it so easy to draft a pattern and my first mock up fit perfectly!
ReplyDeleteHi. Thanks for this tutorial. I have problems with step 1-3. Apparantly my measurement for underbust to mid-bust is shorter than underbust to armscyre. What do I do or what did I wrong?
ReplyDeleteIs the underbust measured from where a modern underbust would be(in other words, directly below the breasts)? Or is it measured from where you want the lower edge of your stays to hit? I ask, because a gore slit of 3" from the top is very nearly my entire underbust to midbust measurement (which is the CF length), and I don't think a roughly 1/4" difference will lend itself to much support.
DeleteYou can definitely adjust where the underbust sits for you to be more comfortable, or adjust the depth of the bust gussets to work better. I have a rather large bust, so this is the configuration that worked for me, but fiddling with the measurements a bit shouldn't cause any major problems! :)
DeleteDo you need to add seam allowance to each panel? I've read and reread and cannot see if for looking. Thanks
ReplyDeleteYes, you'll need to add seam allowance.
DeleteWhat is the point of that curved seam at the back? It could be ommited and It would not change the shape (not according to this draft, that is). Just curious 😄
ReplyDeleteI was mainly just copying the seam placement that I'd seen in extant stays, so I'm not sure of its purpose. You could certainly omit the side-back seam if you liked. :)
Delete